Monday, March 31, 2008

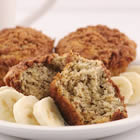
Banana Honey Muffins

I adapted this recipe from one on AllRecipes.com, and changed it quite a bit. I made these once before and used the original recipe and they were just not as tasty. I will post some pictures later on, but wanted to type out the recipe before I forgot. These muffins are high in fiber and really packed with nutrition. I prefer to use 4 bananas, but you can always use 3. I also make these extra large by only making 6, but you can make them smaller by making 10-12 muffins.

Here is the original recipe if you would like to compare.

INGREDIENTS

  • 1 1/2 cups whole wheat flour
  • 1 teaspoon baking soda
  • 1 teaspoon baking powder
  • 4 bananas, mashed
  • 1 teaspoon ground cinnamon
  • 1 tablespoon unsalted butter, softened or melted
  • 1 tsp milled flax seed
  • 2 tsp water
  • 2-3 tablespoons of wildflower honey (eyeball it)

DIRECTIONS

  1. Preheat oven to 375 degrees F (190 degrees C). Lightly grease 6 muffin cups, or line with muffin papers.
  2. In a large bowl, mix together 1 1/2 cups flour, cinnamon, baking soda, and baking powder. In another bowl, beat together bananas, and melted butter. In another small bowl, mix together the milled flax seed and the water. Stir the flax mixture into the banana mixture, this replaces one egg and adds nutritional value to the recipe as well as some grainy goodness. Stir the banana mixture into the flour mixture just until moistened. Stir in the honey and mix together. Spoon batter into prepared muffin cups.
  3. Bake in preheated oven for 20 to 25 minutes or until a fork pressed into the center of a muffin comes out clean.
Nutritional Information:
1 muffin
Calories, 223; Fat, 3.4 g; Saturated fat, 1.2 g; Carbs, 46.2 g; Fiber, 5.6g; Sugars, 14.8g; Protein, 4.9 g; Cholesterol, 5g, Sodium, 292; Calcium 56; Iron 0.9; Vitamin A, 114; Vitamin C, 7.4.

Saturday, March 29, 2008

My Inspiration :)


My Nana just celebrated her second 35th birthday and we threw her a big ole surprise party! Isn't my family adorable??


Shepherd's Pie

I made this a few weeks ago and it was simple and pretty good. Although next time I would use more meat/vegetables and less potatoes. Here is the recipe I used.

30 Minute Shepherd's Pie
As adapted from RachaelRay.com

Ingredients:
  • 2 pounds Russet potatoes, peeled and cubed (2 to 3 large potatoes)
  • 1/2 cups low sodium chicken broth
  • Salt and freshly ground black pepper
  • 1 tablespoon extra virgin olive oil (EVOO)
  • 1 3/4 pounds lean ground beef or turkey (I used turkey)
  • 1 carrot, peeled and chopped
  • 1 onion, chopped
  • 2 tablespoons butter
  • 2 tablespoons all-purpose flour
  • 1 cup beef stock or broth
  • 2 teaspoons Worcestershire sauce (eyeball it)
  • 1 zucchini cubed
  • 1 squash cubed
  • 1 teaspoon sweet paprika
  • 2 tablespoons fresh parsley leaves, chopped
Preparation

Boil potatoes in salted water until tender, about 12 minutes. Drain potatoes and pour them into a bowl. Combine chicken broth (add here whatever you normally do to mashed potatoes, I usually use mayonnaise and butter) and beat until smooth. Set aside.

While potatoes boil, pre-heat a large skillet over medium-high heat. Add EVOO to hot pan, about one turn of the pan, with beef or turkey. Season meat with salt and pepper. Brown and crumble meat for 3-4 minutes. Add chopped carrot and onion to the me

at. Add zucchini and squash. Cook veggies with meat for five minutes, stirring frequently.

In a second small skillet over medium heat cook butter and

flour together for two minutes. Whisk in beef broth and Worcestershire sauce. Thicken gravy, about one minute. Add gravy to meat and vegetables. (Add frozen peas here if you would like, I didn't have room for peas with the squash and zucchini).

Pre-heat broiler to high. Fill a small rectangular casserole with meat and vegetable mixture. Spoon potatoes over meat evenly. Top potatoes with paprika and

broil 6-8 inches from the heat until potatoes are evenly browned. Top casserole dish with chopped parsley and serve.


Thursday, March 20, 2008

Easy Cauliflower Soup


I saw a similar recipe for this somewhere, on some food blog but now I can't remember where I saw it...But anyways, I made this last night because I had a head of cauliflower that I needed to cook up and it was super simple, quick, and pretty tasty! I couldn't remember the original recipe so I made do with what I thought would taste good.

Isn't that what real cooks do? Make things up? I hope so cause this one worked out really well for me!

Easy Cauliflower Soup
  • One head of cauliflower, washed, separated and diced
  • 1 turn of olive oil around pot
  • 1/2 tsp of jarred garlic
  • Two low-sodium chicken bouillon cubes
  • About 3-4 cups of water (eyeball it, the water should just be covering the chopped cauliflower in the pot)
  • A dash of coriander
  • Salt and pepper
  • 1/2 of a small yellow onion, diced
Start by putting the olive oil into a hot cook pot, let it warm and then add the onion. Let the onion cook up a bit and then add the garlic and coriander. Once the onion is clear add in the cauliflower. Cover and let simmer for a few minutes, stirring occasionally to mix everything together. Add the water and the bouillon and salt and pepper, cover and let cook on medium high until the cauliflower is tender stirring occasionally to make sure the bouillon mixes together with everything.

Add 1/2 of mixture to food processor (be careful, its hot!) and pulse until blended. Add remainder of mixture and pulse until blended.

Serve!
Makes about 2-3 big bowls of soup.

Wednesday, March 19, 2008

Don't have much time to work out? Try this

Recently I have made a promise to myself that if I plan on going to the gym that day (which should be at least three times a week, more if the weather is bad and I can't run outside). I have to go on my way home from work, because if I make it home, I usually can talk myself out of going back out again--especially to the gym.

So, we all have those busy days where we have to go meet friends for dinner after work, or we have to go run errands or a movie date or anything else that could possibly keep us from working out. Well yesterday for me, that was one of those days.

My friends and I have started doing a supper club on Tuesday nights, and last night was Alesha's turn. She lives in Durham (about 20 minutes away) and dinner was at 7, so I figured I had somewhere between 15 and 25 minutes to make some magic happen at the gym.

I don't think I have ever gone to the gym for just fifteen minutes, but I figured, something was better than nothing.

So I got on the treadmill and decided that I would sprint 15 minutes, uphill. Not the most fun exercise activity but it definitely maximizes the calories that you could burn. So, next time you think you don't have time to work out, think again! Try this quick 15 minute workout and you will feel at least a little bit better about eating dinner that night.

Start off with at least a 1.0% grade, and gradually move it up to what you can handle for a constant 10-15 minutes. Somewhere between 1.0% and 4.0% (or more if you like). Start out at your normal pace (no less than 6.0, which is a 10 minute mile pace) and after a quarter of a mile, up the speed at least one point. Stay there for a minimum of 10 minutes, and see if you can make it the entire 15 (if you're really feeling good, see if you can maintain an 8.0 speed for the last quarter mile). If you can't, no worries! Keep the grade where it is and walk at about a 4.0 or 4.5 pace for the remaining 5 minutes. You should burn at least 250 calories, and hey, that's not so bad for a 15 minute quickie.

Tuesday, March 18, 2008

Cornish Hens and Chocolate Granola (But not at the same time...)

This past weekend I made what I would call my best meal ever. Sadly, there was no time for pictures of the feast before Matt and I were gobbling it up. Basically, I made two cornish game hens (we only ate one) with dirty rice and fresh Farmer's Market squash, zucchini, carrots and onions. I used my new roaster oven and it took about an hour and a half to cook.

Delish!

There was tons of leftovers, I will be eating them up in the next few days!

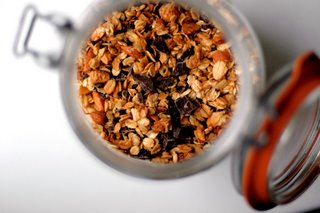
So I was browsing food blogs this morning and came across Orangette, who posted a lovely entry about Paris and her love affair with the food there. I must admit that the baguettes, cheeses, and crepes in Paris were amazing...and something I would love to experience again. She posted a recipe for French Chocolate Granola, and I must try it! Probably will make this while I have the apartment to myself later on in the week....So anyways here goes if anyone would like to try this with me!


3 cups rolled oats
½ cup raw almonds, chopped
½ cup unsweetened shredded coconut
2 Tbsp. granulated sugar
Pinch of salt
6 Tbsp. mild honey
2 Tbsp. vegetable oil
½ cup, or more, finely chopped bittersweet chocolate (Trader Joe’s bittersweet Pound Plus bar was her recommendation)

Preheat the oven to 300°F.

In a large bowl, combine the oats, almonds, coconut, sugar, and salt. Stir well to blend.

In a small saucepan, warm the honey and oil over low heat, whisking occasionally – watch out! the oil will want to splash - until the honey is loose. Pour over the dry ingredients, and stir to combine well.

Spread the mixture evenly on a rimmed baking sheet. Bake for about 20 minutes, or until golden. Set a timer to go off halfway through the baking time, so that you can give the granola a good stir; this helps it to cook evenly. When it’s ready, remove the pan from the oven, stir well – this will keep it from cooling into a hard, solid sheet – and cool completely.

When cool, transfer the granola to a large bowl, storage jar, or zipper-lock plastic bag. Add the chocolate, and stir (or shake, if using a jar or bag) to mix.

Store in an airtight container. Serve with plain milk; soy milk and plain yogurt overwhelm the chocolate flavor.

Yield: about 5 cups

Saturday, March 15, 2008

Mmmm...Apple Cinnamon Heart Healthy Flax Pancakes

It must be admitted that I love Harris Teeter. I love that they have that yummy bread section where you can get a sample of bread and olive tapenade, or bread and "European style" butter, or bread and something else equally spreadable and tasty, (I obviously need those samples, thats not extra calories at all).

But I also know that Harris Teeter (my love) is way more expensive than other grocery store chains. The cleanliness though, usually keeps me coming back for more. Especially now that they just opened a new one, literally, within walking distance of my apartment.

That being said, a new Wal-Mart SuperCenter also recently opened near my work, and while I usually loathe Wal-Mart (I am that person speeding through the parking lot willing to come dangerously close to a tortoise-like family in order to get that spot near the front) because it is usually packed to the brim with people who prefer cigarettes over showers, this one has scored a special place in my heart (right next to that special place for Target, but oh Target! how I have missed you these past few weeks as I have given up shopping).

Anyways, this new Wal-Mart is great, and they have a really fantastic grocery department, so fantastic, that I took myself there last weekend for my weekly food run. It also must be said that I have been trying to cut corners lately, since I will most likely need a new vehicle soon. ANYWAYS, I had so much stuff in my cart that I was sure it was going to be about $250 (cause it would have been at the Teet). I even said so to teh cashier, "Man this s going to be a LOT." She just smiled and said, "Maybe not." She obviously knew something I didn't.

Well....the grand total was only $150! I was so stoked--yep stoked, cause I had saved so much moolah.

I needed to explain this because while I was shopping at the WM, I noticed that they had a ton of options for natural and organic foods (which is a big deal to me, cause I try to only buy these foods) and they were affordable.

While I was browsing the baking aisle, I came across some milled flax seed, so I had to pick it up. I had been reading about how flax is so good for you with lots of Omega-3s. I always buy the Smart Balance butter with flax in it...which is a great butter substitute if you haven't tried it.

So this morning I made pancakes with the flax seed. I used Bisquick Heart Healthy mix (I usually use whole wheat mix but I was out) and where the recipe called for 2 cups mix, I used 1 1/2 cups mix and 1/2 cup flax, and also added some cinnamon to the batter. I cut and peeled an apple into really thin slices and put those into the pancakes and they were sooooo good! Probably my best ever.

The brand of flax that I used is, Hodgson Mill Milled Flax Seed. Go pick some up :) The box also says that you can use milled flax seed instead of oil in recipes! How ingenious.

Thursday, March 13, 2008

Mint Oreo Truffles

I love you Bakerella!!

I am DEFINITELY trying these babies over the weekend...

Mint Oreo Truffles

1 pkg. Double Stuf Oreos - Cool Mint Flavor - (1 lb. , 1 oz. pkg.)
• use 22 cookies with cream centers included
• use 10 cookies with cream centers discarded
1 pkg. (8 oz.) cream cheese, room temperature
chocolate bark or candy coating*
  1. Finely crush the cookies in a food processor or a ziploc bag with a rolling pin.
  2. Stir in softened cream cheese. Use the back of a large spoon to help mash the two together completely.
  3. Roll the mixture into 1" balls and place on wax paper covered cookie sheet.
  4. Place covered in freezer or refrigerator for a few minutes to help retain shape when dipping in melted chocolate.
  5. Melt chocolate as directed on the package and then dip balls into chocolate, tap off extra and set aside on wax paper covered cookie sheet to dry.
  6. Refrigerate and enjoy!
*Or, go green:

white chocolate bark/candy coating for dipping
green candy melts for dipping
  1. Make your green and/or white shamrocks first (see picture below). You can use a ziploc bag with a small corner cut off or a decorating bag with with a small round tip attached to make the shamrocks. Use a toothpick to direct chocolate into desired shamrock shape. (Of course, in hindsight, this would have been a lot easier if I had found some little shamrock sprinkles.) Let dry.
  2. Then, dip half the truffles in white chocolate and the other half in green.
  3. If necessary, dip them again for a smooth finish. I found it necessary, especially for the white ones.
  4. Then, on the second dipping, while still wet, press your cooled shamrocks gently on the top of your truffles.
  5. For another effect, you can take the ziploc bag of chocolate and drizzle across each truffle with the alternating color.
*******UPDATE********
I made these last night and they turned out well, but a little rich for our tastes. I would take the red velvet cake balls over these any day!

Banana Crumb Muffins

So I posted the recipe for these banana crumb muffins two days ago and I promised to update you on how they turned out yesterday. Well, I have been doing so great at cooking lately I must say I was a little disappointed in the outward appearance of my muffins. The crumb topping did not cooperate (I think I used to much butter--also I used Smart Balance Light which they say is not good for baking). But even though it wasn't as crumbly and yummy as I would have liked on top...the muffins still turned out really, really tasty. I might have had three of them yesterday...but they were small so it's ok! :)

Here is the first stage of mixing with the banana mixture:
I cut the recipe in half (Matt and I definitely don't need 12 muffins), if you might be wondering why that looks so tiny, but I also used more bananas. The whole recipe called for 3 bananas, but I cut it in half and still used two. I think if I were to make them again I would add even more bananas.


Here is the flour mixture:
I was a little worried about using whole wheat flour instead of all-purpose flour, but I actually think that the whole wheat gave the muffins a really nutty flavor. If I make them again I will definitely use whole wheat.


Here is how they looked when they came out of the oven...and the sad crumb topping had melted all over the pan. But then I managed to salvage the appearance...and they were yummy!!

Tuesday, March 11, 2008

Tar Heel Born, Tar Heel Bred...

This past weekend was great! Rachael came into town from DC...for the UNC v. Duke game on Saturday, and obviously we Tar Heels kicked some major Blue Devil booty. We watched the game at Ham's in Chapel Hill, and as far as yummy goes, there was definitely not a shortage.

In the course of about six hours, the four of us managed to consume....
  • One order or Thumbs and Toes (boneless buffalo chicken wings)
  • One order of Ultimate Nachos
  • One order of homemade potato chips with ranch dressing
  • One order of french fries
  • One order of Spinach Dip with Pita Chips
  • And we helped Matt with his bacon cheeseburger and fries
I can haz cheeseburger?
So, needless to say I did not do much cooking this weekend.

Sunday night I did make a big pot of what was supposed to be a Mexican chicken soup. It turned out to be more like, spicy chicken vegetable soup, and it wasn't bad. But I think I am going to wait to post a recipe about this one until I try it again.

Tonight is supposed to be the second installment of our Tuesday Night Supper Club, but I think poor Lisa is a tad bit sick today, so we may have to postpone. :( Which wouldn't be such a bad thing because I need to get my self into the gym tonight...I think my lifting is starting to pay off! Getting excited to get into tip top b-suit shape for our Dominican Republic trip over Memorial Day weekend.

In other yummy-related news, I think I am going to try these Banana Crumb Muffins tomorrow morning....
Banana Crumb Muffins
1 1/2 cups all-purpose flour
1 teaspoon baking soda
1 teaspoon baking powder
1/2 teaspoon salt
3 bananas, mashed
3/4 cup white sugar
1 egg, lightly beaten
1/3 cup butter, melted
1/3 cup packed brown sugar
2 tablespoons all-purpose flour
1/8 teaspoon ground cinnamon
1 tablespoon butter

***Although, I will subsitute white sugar for Splenda, and probably only use about 1/2 cup, and use wheat flour instead of all-purpose.***
  1. Preheat oven to 375 degrees F (190 degrees C). Lightly grease 10 muffin cups, or line with muffin papers.
  2. In a large bowl, mix together 1 1/2 cups flour, baking soda, baking powder and salt. In another bowl, beat together bananas, sugar, egg and melted butter. Stir the banana mixture into the flour mixture just until moistened. Spoon batter into prepared muffin cups.
  3. In a small bowl, mix together brown sugar, 2 tablespoons flour and cinnamon. Cut in 1 tablespoon butter until mixture resembles coarse cornmeal. Sprinkle topping over muffins.
  4. Bake in preheated oven for 18 to 20 minutes, until a toothpick inserted into center of a muffin comes out clean.
I will let you know how these work out tomorrow!
<3

Friday, March 7, 2008

Chicken Fajita Burgers with Seared Peppers and Onions

Made these for girls night with black beans and avocado, and sauteed zucchini, tomatoes and mozzarella cheese. They were super easy, relatively healthy, and very flavorful. Enjoy!

**I must credit Rachael Ray for this one...http://www.rachaelray.com/recipe.php?recipe_id=1629&r=1629**


Chicken Fajita Burgers:

  • 1 1/3 pounds ground chicken
  • 1 tablespoons ground chipotle (smoky flavor) chili powder, (a palmful)
  • 2-3 tablespoons chopped fresh cilantro leaves
  • Several drops hot sauce
  • 1 tablespoon grill seasoning (such as Montreal Steak Seasoning by McCormick)
  • Extra virgin olive oil (EVOO), for drizzling
  • 4 whole wheat hamburger buns

Seared Peppers and Onions:

  • 1 tablespoon extra virgin olive oil (EVOO), 1 turn of the pan
  • 2 red or green bell peppers, seeded and thinly sliced lengthwise
  • 1 medium yellow skinned onion, thinly sliced lengthwise, reserve 1/4 of a piece, uncut
  • 1 jalapeno or serrano, seeded and chopped
  • 2 cups tomatillo, green chili salsa or chipotle-tomato salsa, your choice
Prep:

Heat a grill pan or large skillet over medium-high heat.

For Chicken Fajita Burgers:
Combine chicken, chipotle powder, cilantro, hot sauce and grill seasoning. Score and divide meat into 4 sections and form big patties, 1-inch thick. Drizzle patties with EVOO and cook 6 minutes on each side or until meat is firm and cooked through.

For Seared Peppers and Onions:
Heat a medium skillet over high heat. Add EVOO and peppers and onions. Stir-fry the veggies tossing them with tongs to sear them at edges. Add the jalapeno or serrano pepper. Toss and turn the mixture about 3 minutes, then add salsa of choice and toss a minute longer. Place burgers on each bun bottom and top with 1/4 of the pepper and onion mixture and bun top. Serve Bacon and Bean Smash on the side.

Red Velvet Cake Balls

A co-worker brought these in to work for us to try (or either to torture us I'm not sure which), and I made them last weekend. They are probably one of the best things I have ever eaten, so if anyone would like to try duplicating them, here is where I got the recipe.

http://bakerella.blogspot.com/2007/12/red-velvet-cake-balls.html

Enjoy!

Zucchini, Mushroom and Garlic Chicken Rotini

I made this last night, and it was amazing...I don't have any pictures, but now that I am writing this blog I will try and remember to immortalize my work in pictures before we scarf it all down...

I got the idea for this from www.RachaelRay.com, she posted a pasta recipe with basil and gorgonzola cheese. I have never been much of a gorgonzola fan but I think that the tart flavor actually made this dish.

Serves 2...with leftovers.

Ingredients:
  • two boneless skinless chicken breasts
  • oregano (enough to sprinkle on the chicken)
  • basil (same)
  • 1/2 jar of Bertolli Roasted Garlic spaghetti sauce (or whatever sauce you like, this one is yummy)
  • 1/2 box of Barilla Plus Rotini
  • About 1/4 cup of gorgonzola cheese crumbles
  • Olive oil (to season chicken, and to sautee veggies in)
  • 1/2 cup button mushrooms chopped (4 ways)
  • 1 zucchini chopped
  • salt and pepper

Boil and salt water for pasta. Cook until al dente. In a pan heat a few turns of olive oil. Sautee zucchini and mushrooms until tender. Pour in spaghetti sauce and heat through.

Season both sides of chicken with olive oil, salt and pepper, basil and oregano. Cook on George Foreman (or you could sautee if you don't have a Foreman) until cooked through.

In a bowl, mix together pasta, sauce and veggie mixture and cheese. Serve on a plate with the chicken. Enjoy!

(I also think that adding some sliced black olives to the veggies would be good, or some capers...but that is optional).

Here I go again...

A Blog About All Things Yummy? What does that even mean?

Well I started this blog as a way to share recipes and cooking tips with friends and family, after reading some really great blogs such as www.pinchmysalt.com and bakerella.blogspot.com.

I don't claim to be a professional chef, or even a great cook--but I am getting better every day and the important thing is that I love to do it!

I have always loved to cook, ever since my grandmother taught me how to make omelets and biscuits and gravy....("I taught her everything she knows about cooking!") but I must say, I try and cook things a bit healthier these days. :)

I love health food--and you could call me a health food nut--so I definitely try to incorporate that into all that I cook. Whether that means sneaking veggies in where they usually aren't, substituting healthy versions of cheese or dairy products...or even going meatless. But don't worry...I am def not a vegetarian, although I don't eat too much meat these days.

It is really hard to eat healthy on a budget, and to stick to your diet while you're traveling so I would also like to use this as a way to offer tips that I might have, and tips that you guys might have.

I have to credit most of my healthy-ness (sp??!) right now to www.myfooddiary.com. This online food diary showed me that although I was eating a salad, that high fat ranch dressing and bacon crumbles basically made it as bad for me as a burger and fries...since I started using this diary last year, I have trimmed down and learned what I could and couldn't eat if I wanted to be healthy. I would recommend this to anyone who is starting out with a diet plan, because diets don't work! You have to truly change your habits....I think Rachael, Meredith and moms would agree that MFD has worked for us quite well.

Anyways enough with the awkward intros....on to the food :)